
Affiliate Disclosure: Some links on this page are affiliate links. As an Amazon Associate, we earn from qualifying purchases — at no extra cost to you. We do not buy, install, or physically handle the cameras we cover; our rankings come from aggregated owner reviews, ratings and expert consensus. Commissions never change our verdicts. We're reader-supported: commissions fund hosting, research and updates, so if a guide helped, buying through our links keeps it going. How we rank · full disclosure.
Short version: when buying security cameras as a first-time homeowner, resist the urge to buy a full multi-camera kit on day one. Start with the single highest-value position (almost always the front door), live with it for a month, and expand only where you discover an actual gap. This guide is the starting point for that decision, not a replacement for the deeper category guides it links to.
In Plain English
A security camera is a small video camera that watches part of your home and sends the picture to an app on your phone. For a new homeowner, the big risk isn’t picking the wrong brand. It’s buying too much, too soon.
Think of it like furnishing a new house. You wouldn’t buy every piece of furniture before living in the rooms. Cameras work the same way. Live in the place for a while and you’ll learn where people actually come and go.
That’s why this guide suggests starting with one camera at the front door. A video doorbell (a doorbell with a built-in camera) covers deliveries, visitors and one of the most common ways people approach a home. Before you buy, make two choices. Will you pay a yearly or monthly fee to store video online, or keep it on the device? And will the camera run on a battery, a power cable, or PoE (one network cable that carries both power and data)? Answer those two first and the rest gets much easier.
The Three Cameras Most New Homeowners Add First

The highest-rated outdoor camera tracked on this site with one of the highest ratings and deepest review bases we track, a common first purchase for the driveway or main approach. Motion-activated LED floodlights pair with 1080p color night video on permanent wired power.
Why You Should Get This
For most new homeowners, the driveway or main approach is the first position to cover, and this is the most review-validated camera for that job.
| Resolution | 1080p HD |
| Field of view | 140° horizontal |
| Power | Hardwired, existing outdoor fixture |
| Night vision | Color night vision |
| Audio | Two-way talk |
| Siren | 105dB built-in siren |
| Lighting | Motion-activated LED floodlights |
| Smart home | Works with Alexa |
Benefits
- Highest-rated outdoor camera tracked on this site.
- Never needs a battery recharge.
- Color night video from the floodlights.
Pros and Cons
- Massive, consistent review base.
- Motion-activated floodlights double as a deterrent.
- Reliable wired connection.
- Needs an existing wired fixture or electrician.
- 1080p rather than 2K/4K.
- Recorded clip history needs a subscription.
Features
- Motion-activated LED floodlights.
- 105dB built-in siren.
- Two-way talk.

The most-reviewed video doorbell tracked on this site, the second camera most new homeowners add, with one of the deepest, highest-rated review bases we track. Its head-to-toe view shows the package on the mat. It runs on a removable rechargeable battery with no wiring required.
Why You Should Get This
After the driveway, the front door is the second position most new homeowners cover — this is the most review-validated pick.
Benefits
- Deepest review base of any video doorbell tracked on this site.
- Head-to-toe view shows the whole doorstep.
- No wiring required.
Pros and Cons
- Largest, most trustworthy review base.
- Motion zones cut sidewalk false alerts.
- Live view and two-way talk work with no plan.
- Recorded clip history needs a subscription.
- Lower resolution than Ring’s 4K Pro doorbells.
- Battery recharge every two to four months.
Features
- Head-to-toe 1:1 view.
- Removable battery or hardwiring.
- Two-way talk.
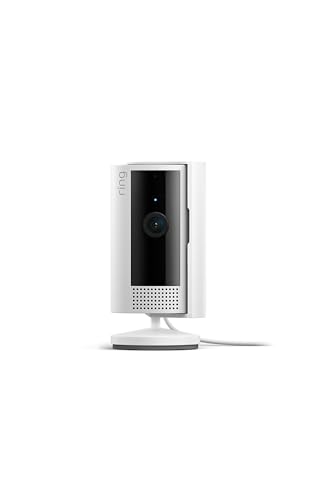
The most-reviewed inexpensive indoor camera tracked on this site, a common third purchase for a main living area, with one of the deepest, highest-rated review bases in the category. 1080p HD video with two-way talk and a physical privacy cover. Plug-in power means nothing to recharge.
Why You Should Get This
After outdoor and doorbell coverage, an indoor camera is the third position most new homeowners add.
Benefits
- Most-reviewed inexpensive camera in the category.
- Physical privacy cover for peace of mind.
- Plug-in power, nothing to recharge.
Pros and Cons
- Massive, trustworthy review base.
- Low price for a third camera.
- Simple plug-in setup.
- Recorded clip history needs a subscription.
- 1080p rather than 2K.
- Indoor use only.
Features
- 1080p HD, two-way talk.
- Physical privacy cover.
- Plug-in power.
Your First Camera
For most first-time homeowners, a video doorbell is the right starting point — it covers the delivery point, the visitor point, and often one of the most common approach routes, all from one device. See best security camera for front door for the specific shortlist, and decide the subscription question early using Ring’s value guide or an equivalent brand page, since it affects which doorbell actually makes sense for your budget.
The Two Decisions to Make Before Buying Anything
Subscription or local storage. This is the single biggest cost variable over time, and it’s much easier to decide once, upfront, than to switch ecosystems later after you’ve already invested in one brand’s devices. See buying guides for the full breakdown.
Battery, wired, or PoE. Walk your actual property before buying — where are the outdoor outlets, where would cable runs be realistic, and where would a battery camera’s recharge cycle be a genuine hassle versus a non-issue. See battery vs wired and PoE vs wireless.
What Consumer Reports says: Its home security camera buying guide notes that cloud subscriptions run from about $1 to $30 a month, while local storage on a microSD card avoids monthly fees. It also advises setting strong, unique credentials, turning on two-factor authentication, and keeping cameras out of highly private spaces such as bedrooms.
Budget Expectations for a New Homeowner
A reasonable starting budget for the first camera or two: a modest hardware cost, plus nothing to a modest annual fee if you choose a subscription-model brand. This is enough to cover the front door and one additional position without committing to a full system before you’ve lived in the house long enough to know what you actually need. See how much does a security camera system cost for the fuller breakdown, including what a complete system runs if you decide to go bigger later.
Common First-Time Mistakes
- Buying a full kit before understanding the property’s actual weak points. Live in the house a bit first — the position that felt vulnerable on move-in day often isn’t the one that matters most in practice.
- Mounting too high, out of habit from seeing commercial cameras. Around eight to ten feet is the range Ring recommends for its outdoor cameras, not gutter height.
- Skipping the WiFi signal check at the mounting spot. This is the single most common install-day mistake, covered in how to install a security camera.
- Not budgeting the subscription as part of the purchase price. A cheap camera with an expensive ongoing fee isn’t actually cheap over five years.
Tip Call your insurer once your setup is in place. A camera-only setup may or may not qualify for a discount, and it isn't always applied automatically.
Insurance and Documentation
Many home insurers offer a discount for protective devices: according to the Insurance Information Institute, discounts of at least 5 percent are usual for a burglar alarm, smoke detector or deadbolt locks, and some insurers cut premiums by as much as 15 or 20 percent for a sprinkler system plus a fire and burglar alarm reporting to a monitoring station. A camera-only setup may or may not qualify, depending on the insurer. It’s worth a call to your specific provider once your setup is in place, since this isn’t always applied automatically without notification.
Placement Priority Order for a New House
Walk the property before ordering anything. Prioritize in roughly this order for a typical single-family home:
- The front door or main entry. It covers deliveries, visitors and the most common approach for a break-in attempt.
- The driveway or any side entry that is out of view from the street. Out-of-sight entry points appeal to intruders precisely because neighbors cannot see them, and burglars surveyed by UNC Charlotte researchers said outdoor cameras and alarms were among the signs of security they weighed when choosing a target.
- A rear or side yard access point, particularly a gate or a sliding door.
Only after those three does a general-purpose indoor camera in a main living area typically make sense. For most first-time homeowners, that is where the initial two-camera or three-camera budget should stop, at least until you have lived in the house long enough to know what is actually missing.
DIY Install vs Hiring an Electrician
Battery and plug-in cameras are a same-day DIY job for almost any new homeowner comfortable with a screwdriver. Bracket, screws, app pairing — typically under thirty minutes per device. A wired floodlight camera is a different job. So is any device connecting to an existing junction box at mains voltage. A meaningful share of buyers hire a licensed electrician for that step rather than working at a breaker panel themselves, particularly in a newly purchased home where the condition of the existing wiring is still unknown. If your inspection report flagged anything about the electrical panel or outdoor wiring, resolve that first, before adding a wired camera to the same circuit.
What Your Existing Doorbell Wiring Means for Your Choice
If the house already has a wired doorbell with a transformer behind the wall, a hardwired video doorbell can often use that existing wiring. That simplifies installation and removes the battery-recharge question entirely. If there is no existing doorbell wiring, or the home has a battery-only chime, a battery-powered video doorbell is generally the simpler starting point. Running new low-voltage wiring purely to enable a wired doorbell is rarely worth it for a first camera. Check your specific doorbell model's power requirements against what you find behind the existing plate before assuming compatibility either way. A mismatch here is a common early frustration for new owners who assumed one model would simply drop in.
Privacy and Neighbor Considerations
A new homeowner is also, often for the first time, a permanent fixture in a neighborhood. Camera placement affects that relationship. Angle outdoor cameras to cover your own property — your door, your driveway, your yard — rather than a neighbor's windows, yard or shared fence line. That matters as a courtesy, and because several states and municipalities have specific rules about recording audio or video that captures a neighbor's private space. If you share a driveway, a fence line, or a line of sight with an adjoining property, a brief conversation with the neighbor before installation tends to prevent the kind of dispute that shows up in local community forums far more often than it needs to.
Accessories Worth Having on Hand

Best for local recording set up correctly from day one in a new home.

Best for a first camera mount at the right height and angle.

Going Deeper: What’s Behind Your Existing Doorbell Button
If your house has a wired doorbell, a small transformer somewhere is feeding it low-voltage power. Ring says the existing transformer is typically found in a junction box behind the indoor chime, or mounted near other electrical components in a basement or crawlspace, according to Ring’s transformer installation guide. Google’s Nest support adds the main electrical panel, the garage and the attic as common spots. On one side the transformer connects to your household power wires; on the other it supplies the thin doorbell wiring that runs to the button.
Two numbers on its label decide whether a video doorbell will run from it: the output voltage (V AC) and the power rating in volt-amps (VA). Requirements differ by model. Ring’s hardwiring guidelines list 8 to 24 VAC and 5 to 40 VA for its battery doorbells when hardwired, 10 to 24 VAC and 8 to 40 VA for the Video Doorbell Wired, and 16 to 24 VAC and 10 to 40 VA for its Pro and wired Pro models. Google lists 16 to 24 V AC and 10 to 40 VA for the wired Nest Doorbell, and Ring recommends at least 16 volts AC and at least 30 volt-amps for its own hardwired transformer kit.
Getting this wrong matters. Ring warns that incorrect power ratings can damage your devices or stop the in-home chime from working properly, and that multiple hardwired doorbells on a single transformer might need a higher VA rating, according to Ring’s power troubleshooting page. Swapping a transformer also means working on mains wiring: Ring’s guide starts with turning off the circuit breaker and notes that a qualified electrician, and permits, may be required by local law. That’s the practical reason the electrician question above comes before the doorbell purchase, not after.
Where to Go Next
Start at best security camera for front door for your first purchase, then work through buying guides for the subscription and power decisions before expanding to a second or third position.
Sources & References
- Home Security Camera Buying Guide — Consumer Reports
- 12 Ways to Lower Your Homeowners Insurance Costs — Insurance Information Institute (Triple-I)
- Through the eyes of a burglar: study provides insights on habits and motivations — UNC Charlotte
- Understanding Ring Protect subscriptions — Ring
- Positioning Doorbells and Security Cameras — Ring
- Battery Doorbell tech specs — Ring
- Guidelines for Hardwiring Your Ring Video Doorbell — Ring
- Troubleshooting power for hardwired doorbells — Ring
- Installing Hardwired Transformer Kit — Ring
- Upgrade your transformer for Nest Doorbell (wired, 2nd gen or 3rd gen) — Google Nest Help