
Affiliate Disclosure: Some links on this page are affiliate links. As an Amazon Associate, we earn from qualifying purchases — at no extra cost to you. We do not buy, install, or physically handle the cameras we cover; our rankings come from aggregated owner reviews, ratings and expert consensus. Commissions never change our verdicts. We're reader-supported: commissions fund hosting, research and updates, so if a guide helped, buying through our links keeps it going. How we rank · full disclosure.
Short answer: mounting a security camera on brick means drilling, not adhesive. Brick's texture and porosity defeat mounting tape almost every time, even tape that holds reliably on smooth surfaces like vinyl or painted wood. The standard approach is a masonry drill bit matched to a plastic wall anchor, following the sizing the camera's own mounting kit specifies, with the anchor set into either the brick face or the mortar joint between bricks.
Recommended Cameras for a Brick Mount

Best for a simple bracket mount well suited to a drilled masonry anchor.


Best for a doorbell that mounts to a brick facade with a masonry anchor.
How to Mount a Security Camera on Brick, Step by Step
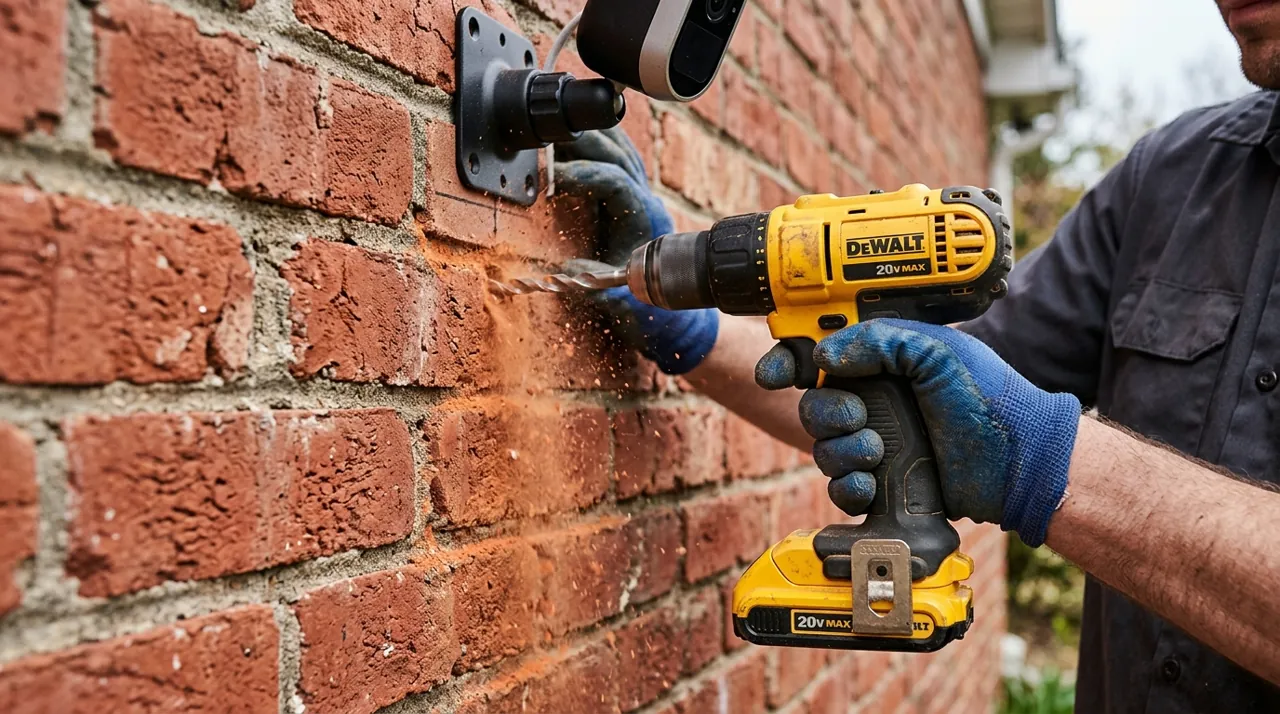
Start by marking the exact hole positions using the camera's own mounting bracket as a template, holding it level and tracing the screw holes with a pencil. Switch the drill to hammer or masonry mode if it has one, fit a masonry bit sized to the anchor, and drill straight into the marked points at a slow, steady speed — forcing the drill or angling it off-center is the most common cause of a cracked or chipped brick face. Clear the dust from each hole, tap the plastic wall anchor in flush with the surface, then screw the bracket into the anchors and mount the camera.
Drilling into the mortar joint between bricks rather than the brick itself is a reasonable alternative some installers prefer, since mortar is generally softer and easier to drill cleanly, and a properly set anchor in mortar holds a lightweight camera just as securely as one set into brick.
What Makes Brick Different From Other Surfaces
Brick's porosity is the core issue — the same texture that makes it a durable building material gives adhesive almost nothing consistent to grip, and any bond that does form tends to fail faster under temperature swings than it would on a smooth surface. Brick is also harder and more brittle than wood or vinyl, which is why a proper masonry bit and a patient, steady drilling technique matter more here than on any other common exterior surface — a standard wood or metal bit will dull quickly and struggle to make a clean hole.
Weathered or older brick can also be softer and more prone to chipping around a drilled hole than newer brick, so testing the drill on an inconspicuous area first, or drilling into a mortar joint instead, is a sensible precaution on an older facade.
Routing Cable on a Brick Wall
For a wired or PoE camera, running cable across a brick exterior needs its own plan, since brick does not accept a simple adhesive cable clip the way vinyl or wood siding does. Small masonry cable clips, set with their own tiny anchors, are the standard solution, spaced every foot or two along the cable run to keep it secured and tidy. Routing the cable through a mortar joint rather than across the brick face, where practical, also keeps it more protected from weather and less visually obtrusive.
See how to mount a camera on vinyl siding for the equivalent process on a very different surface, and how to install without drilling for the surfaces where a drill genuinely is not required.
The Drill and Tools an Owner Needs for This Masonry Job
A hammer drill with a masonry chuck is not strictly required for a lightweight camera mount — a standard drill with a good masonry bit and a patient, low-speed approach handles most residential brick jobs fine. Beyond the bit itself, the essential kit is small: the plastic wall anchors sized to the bit, the screws included with the camera's bracket, a level to keep the bracket straight, and a shop vacuum or a can of compressed air to clear drilled dust from each hole before setting the anchor. Owners who skip clearing the dust report anchors that grip poorly, since packed dust in the hole prevents the anchor from expanding fully against the brick.
A tube of exterior-rated caulk is worth having on hand as well, both to seal around the finished mount where water could otherwise track in behind the bracket, and to fill any stray hole from a misplaced first attempt. Brick is forgiving of a small cosmetic patch in a way that is genuinely hard to notice once painted or left to weather naturally, so a mismatched hole is rarely a serious problem.
Painted or Sealed Brick Needs Extra Care
Painted brick and brick treated with a masonry sealer behave slightly differently under a drill than raw brick does, and it is worth accounting for. A painted surface can chip at the entry point of the hole in a way raw brick generally does not, so starting the hole at a slightly reduced speed and easing into full speed once the bit is through the paint layer reduces that risk. Sealed brick similarly benefits from a slower start, since the sealant coating can otherwise cause the bit to skate across the surface before it bites in. Neither problem is difficult to manage. Both simply reward a little extra patience over the first few seconds of drilling compared to unfinished brick.
Hammer Drill vs Regular Drill on Brick
A hammer drill combines rotation with a rapid pulsing action that helps a masonry bit break through hard material faster, which is genuinely useful on older, denser brick or when drilling several holes in one session. For a single lightweight camera mount, a standard drill fitted with a proper masonry bit works fine too. It simply takes a bit more patience and a slower, steadier approach. Neither tool is wrong, and it is reasonable to rent or borrow a hammer drill for a one-off job rather than buying one specifically for a single camera install.
After the Camera Is Mounted: A Quick Weatherproofing Check
Once the bracket is screwed in and the camera is attached, a small bead of exterior-rated caulk around the top and sides of the bracket, leaving the bottom edge open, helps water run off rather than pooling behind the mount. This step is optional on a fully sheltered wall but genuinely worthwhile on an exposed brick face that takes direct rain. Give the camera a final level check and a firm tug test before considering the job finished, confirming both the anchors and the bracket screws are properly seated.